Article

Good News…

So I have some good news. This whole cooking thing started off as a few fun posts about Grenadian foods here and there and has sort of became bigger than it started off as. Which is great! I am loving spending time coming up with delicious recipes and it will be fun to make a larger priority to doing so.

So the news is – WE’RE MOVING! Yep, I am going out and getting a big-girl cooking blog. Tyler is hard at work designing a wonderful site and it will be up and running on my very own site. And let me tell you, it’s going to be great. I will post the new address here once we have it up of course.

The bad news in this is I probably won’t be posting anything more on here until that gets all done and pretty. All of my new food creations will get drafted into the new site so that all the new posts will be of the new and improved form. But good news is it comes with lots more fun features like printable recipes, a better layout, and nicer pictures. I upgraded my set-up and Tyler and I are working on getting those styled up much better. Things will only get better as we get back to the States and can get a few needed equipment pieces.

So fun things ahead! This term in school is brutal so it might take a bit, but we already got some fun posts cooking so once it opens, it is sure to wow!

And…I might even re-do posts on some of my most popular recipes too – hopefully to make them even better!

More to come soon, I promise!

Article

Scrumptious Roasted Chicken and To-Die-For Gorgonzola Roasted Potatoes

So I think we can all agree that Tyler is going to be one sad boy when school goes back to being super busy and he isn’t getting awesome delicious home-cooked meals all the time. I mean its not like I totally slack off (even if it appears so from the blogging frequency) but I certainly rely on good ol’ simple standard WAY more. But that is besides the point right now. For now he is in happy husband heaven and good food abounds. And hopefully the food and blogging will stay, at least for a bit.

Anyways, I decided to test out some dishes the other night. I always hesitate undertaking big new things when I am serving to a crowd. I tend to learn a lot the first time and try two is almost always better. Plus I tend to forget silly things like seasonings when distracted so the more comfortable I am with what I am making, the better. So with Tyler’s parents coming in July and thinking ahead to a possible Thanksgiving dinner at our place come October (yep, our Thanksgiving is different in Grenada) I thought I should try out some big crowd dishes. So roast chicken and potatoes it was!

I have never roasted a chicken. I mean the principles behind it seem easy – and I have helped with dozens or dinners but never really done. And I can now see why dinner is never on time, it seems the bird just decided how long it is going to take without informing you or the logical recipe you are following.

Roasted ChickenBut anyways, I found this roast chicken recipe in my Bon Appetit magazine and decided it was perfect to try. I used two small Cornish hens mostly due to the actual small chickens looking horrible that day and we are only two people, how much can I make? I must say the recipe is superb. Loved the flavors! My little chickies decided to take their sweet time cooking. And I since decided that to get that crispy and brown skin they had in their photographs I should probably up the cooking temp earlier on. My internal temperature was where it needed to be before the skin ever started to brown. I waited a while longer, but I was getting hungry and fearing I would overcook the meat. Also maybe more honey, but I think it was mainly a temperature thing.

Ready for the oven

Chickens before the oven - already looking tasty.

Gorgonzola PotatoesThe second dish that got attempted that night was these fully-loaded gorgonzola roasted potatoes. These were seriously so delicious. I was pretty sure the recipe was going to bomb-diggity the minute I read it – I mean potatoes and cheese and bacon is ALWAYS delicious. But it was so worth every minute of waiting for them to roast. I am contemplating making them again for lunch today just because they are so tasty.

No reposting of the recipes for me today – none of my own work really went into these. But, honestly I was able to use so many local ingredients that minus the waiting time, these were actually quite simple. The local rosemary packs were super cheap and created amazing flavor in the chicken (and made my house smell amazing! Plus local potatoes are easy to come by along with all the fresh herbs to go on top.

These are well worth the try – I know I will be making them again!

Enjoy!

Article

Raspberry Almond Muffins

I have certainly been on a big baking kick lately. I think it has been partially brought on by the responsibility of making snacks for CSA every week this summer. So today I decided that some breakfast muffins sounded great. Usually Tyler gets a hankering for blueberry muffins and I generally make them from a mix. Fresh blueberries don’t come here, frozen ones (if I can find them) are way overpriced so I cheat. But today I decided to make some from scratch using a recipe in my trusty cookbook. I am not a fan of plain muffins, so I course picked a jazzed up version. I actually was thinking of making apricot almond muffins but part way through I realized I had eaten most of the dried apricots I had (oops!) and then remembered I had some delicious raspberry jam I should use up – so really it worked out great.

What You Need:

3 cups flour
1 cup sugar
1 Tbs baking powder
1/2 tsp. baking soda
1/2 tsp. salt
1 1/2 cup low-fat plain yogurt
2 eggs
1/2 tsp. almond extract
8 Tbs. butter melted and cooled
1/4 cup raspberry jam or preserves 

Preheat oven to 375 and line or spay your muffin tin. Mix the flour, sugar, baking powder, baking soda, and salt together in a large bowl. In another  bowl whisk together eggs and yogurt and extract in a large bowl.

Mixing the yogurt mixture into dry ingredients.

Gently fold in the yogurt mixture into the dry ingredients until just blended. Fold in the melted butter. The batter is very dough-like rather than soft and runny.

The batter - it comes out really doughy.

The batter - it comes out really doughy.

Into each muffin cup spoon about 2 Tbs. of batter. Add 1 tsp. of raspberry jam to the center of each muffin. Top muffins with remaining batter evenly and bake for about 20-25 mins or until golden brown and tester comes out clean.

Filling the muffin tinsReady for the oven

For added pizzaz, I usually add a light sprinkling of sugar to the top of each muffin right before baking. It is something I learned to do as a kid when my Grandma taught me how to make muffins from scratch. I don’t know if she necessarily taught me to do it that way or if my 9 year-old self just thought homemade muffins just were not sweet enough. Now I do it for the little crunch it gives on top.

Out of the oven goodness

Out of the oven goodness - nice and golden

Enjoy!

Article

Cherry Cream Tarts

Cherry Cream TartsSometimes I find recipes in very strange ways. I am a firm believer that you never know that if the back of that pasta box or the inside of the butter tub might have something worth trying, or at least worth taking inspiration from. Well this recipe probably came from the strangest place possible, a My Little Pony coloring book. No joke! Almost two years ago now I was volunteering at a hospital working on the pediatric floor and I used to photocopy coloring book pages for the children to color on. While flipping though the My Little Pony coloring book I stumbled upon this recipe, read it, and decided it was worth saving, It is still scribbled on a cut up sheet of fax paper I stole to write it down on. I really need to get a fancy smancy recipe box with cards, but that is another story.

I tried this recipe out then and made them for my husband (then boyfriend) as a fun dessert and he loves them. They are the perfect serving size of a  delicious cheesecake-like dessert.

What You Need:

2 8oz. packages of cream cheese
1/2 cup + 2 Tbs. white sugar
2 eggs
1tsp. lemon juice
1 1/8 cups graham cracker crumbs
1 pinch cinnamon
1/4 cup butter
1 21oz. can cherry pie filling

Preheat oven to 350 degrees. Line muffin tins. For these I actually like the foil liners as they really help when you eat the cream tart out of them. I am sure regular ones work okay though. But you have to line!

To Make Filling: Cream with an electric mixer the cream cheese and 1/2 cup sugar. Slowly add in eggs, vanilla, and lemon juice and mix well.

To Make Crust: Combine crumbs, 2 Tbs. sugar and cinnamon in a bowl. Cut in butter until crust forms small crumbs. I usually use my hands.

Making the crustAdd the filling on top

Put on spoonful of crust into each cup then add layer of filling.  Bake for about 25-30 minutes so that custard is firm but springy to touch. It usually puffs up and then drops down some as it cools. Spoon cherry fulling over the top and then chill.

What they look like out of the oven

Out of the oven - ready for filling

All done - and tasty!

All done - and tasty!

Enjoy!


Article

Mayan Chocolate Brownies

Mayan Chocolate BrowniesI really felt like baking yesterday and my heart was feeling chocolate. So a natural inclination was brownies. But as I was searching around, I found some recipes for spicy chocolate brownies. And so my Mayan Chocolate Brownies were born. Despite taking several hours due to a prolonged propane tank situation, they were baked and turned out delicious. The recipe I used was based largely on one in the Whole Foods iPad app, but I modified it a little bit. I added more “spicy” because I wanted the flavor to really push through the sweet brownie, and I loved that this recipe kept them from being too sweet. It really is not that spicy, but if you are nervous you could use less cayenne. I think next time I might try it with some of the local chili powder too.

What You Need:

This is the good stuff

This is the good stuff

2.5 ounces unsweetened chocolate (the Grenadian Chocolate company 100% cocoa bar worked marvelously!)
1/2 cup unsalted butter
1 tsp. cinnamon
1/4 tsp. nutmeg
1/4 + 1/8 tsp. cayenne pepper
1/2 tsp. baking powder
2/3 cup flour
1/4 tsp. fine sea salt
1 cup sugar
2 eggs
1 tsp. vanilla extract

Preheat your oven to 350 and prepare an 8 inch pan by lining it with aluminum foil leaving enough to hang over two of the edges. This was different, but it made getting the brownies out super easy and no washing the pan! Butter the foil.

Melt the chocolate (chopped into pieces) and butter in a small saucepan on low until almost all of the chocolate pieces are melted. Remove from heat, stir until rest of chocolate melts, and allow to cool.

Whisk together flour, spices, baking powder, and salt. Pour chocolate mixture into a medium bowl and stir in sugar and eggs and vanilla. Add flour mixture and stir just until smooth. Pour into a prepared pan and bake until top is dry and a tester comes out without any raw dough, about 25-30 minutes. My oven is hot and I baked them about 25 minutes – I really wanted to preserve the moist centers and I think they came out perfect.

BeforeAfter

Allow to cool then remove from pan via the foil and then you can slice them up and a cutting board. I made the brownies into sundaes with some vanilla ice cream for a delicious summer treat!

Oh, and this also marks the first post where I am trying to stop being lazy and use our nice camera. Now naturally I tried to take most of these pictures at night and we still don’t have the best kitchen lighting, but I have hopes that they might improve. We will see.

Enjoy!

Article

French Lemon Yogurt Cake

I finally caved and bought a subscription to one of my favorite cooking magazines, Bon Appetit. So it only makes sense that I would be taking some of the recipes, or the inspiration from them, for a spin. I am saddened that all of their amazing sounding salmon, clam, and steak dishes might have to wait to be back in the land of large supermarkets that stock everything, but I always love more things to try. So I found this cake and even though I just got a mixer (hallelujah!) I didn’t even need it. This was so simple to make, and is basically a pound cake. Which is great because you can’t really go buy pound cake at the bakery here like back home.

What You Need:

nonstick spray
1 1/2 cups flour
2 tsp. baking powder
3/4 tsp. salt
1 cup sugar
1 Tbs. grated lemon zest
3/4 cup whole milk yogurt (recipe calls for Greek, but plain regular whole-fat yogurt worked fine)
1/2 cup vegetable oil
 2 eggs
1/2 tsp. vanilla

Oven is heated to 350 (my new oven still runs hot so I have to be careful, I overcooked and burned the edges of the first one). Spray a loaf pan with cooking spray and dust with flour to coat. Whisk together the flour, baking powder, and salt in a bowl. In a separate bowl rub the lemon zest with the sugar. I love how the Grenadian green lemons produce a fun color to this.Getting things ready

Then mix in the yogurt, vanilla, oil and eggs and whisk to blend. Carefully fold in the dry ingredients just to blend and pour into prepared muffin pan. Be sure to smooth the top so it comes our pretty! Bake until golden brown and tester comes our clean which should be about 50 minutes. Then just let it cool.

BakingAll done!

The cake tastes great plain – I even served it for snacks at church one week. But since I was feeling like a special treat I bought some frozen berries from the store and made my homemade whipped cream (with my mixer!) and we made berry shortcake. Tyler was in little piggy heaven!

Enjoy!

Article

Sangria

SangriaI love sangria. To me, it is the perfect hot summer treat. And since we now live in the Caribbean, it is hot and summery every day. I found the inspiration for this Sangria recipe from the Whole Foods iPad app. I know that sangria recipes usually call for the addition of some sort of liquor (this one for triple sec) but I actually left it out. I like that this way I can drink more of it. I have been now intrigued by all sorts of other Sangria recipes that I hope to be trying out soon.

What You Need:

1 bottle red wine (something aged in metal barrels, and no need for anything expensive)
1/2 cup fresh squeezed orange juice
1/4 cup sugar
1 small orange sliced thinly
1 lemon sliced thinly
2 malay apples or frech cashews, sliced (recipe originally called for peaches but those are no local and I loved what these apples added)
1-2 lemons worth of juice
1 cup club soda

In a large pitcher (or a mason jar) combine everything except the last two ingredients together. Be sure the sugar is dissolved into the wine before adding the fruit pieces. Let sit in the refrigerator anywhere from 2 hours to overnight. Just before serving, stir in the lemon juice and soda and serve over ice. If you want a sweeter take, ginger ale will also work in place of the lemon juice and club soda. I think the recipe originally called for lemon italian soda, but I just made my own.

Enjoy!

Update: With malay apples being out of season, I have recently started using fresh starfruit from my backyard with amazing results. Feel free to experiment with this part. 

Article

Fruit n’ Nut Baked Oatmeal Bars

Finished ProductThese are seriously my new favorite thing! I am a sucker for baked oatmeal – I fell in love with it in college. I had all-but forgotten about it until while looking for make-ahead breakfast ideas I stumbled upon a recipe here. So with a little experimenting and searching the stores for all the dried fruit I could find, I created my own version of these tasty little bars and baked up a batch. Wrapped them and froze them and they soon became my go-to quick breakfast. While it was hard to beat the unbelievable taste of the quiche I made, these take a fraction of the prep time.

What You Need:

2-1/4 C quick cooking oats, uncooked, or 2-3/4 C old fashioned oats, uncooked 
2/3 C brown sugar 
3/4 C raisins and/or dried cranberries (substitute any other dried fruits you want)
1 apple, peeled and sliced (substitute other fresh fruits – I used malay apples (french cashews) or jared fruit I found at the store for a cheaper alternative to fresh apples)
1/4 to 1/3 C nuts, chopped (walnuts, almonds, sunflower seeds, hazelnuts…, or even better a mix of all)
1 tsp ground cinnamon 
1/2 tsp salt
3-1/3 C milk 
2 eggs, lightly beaten
1 Tbsp vanilla extract

I usually added more dried fruit and nuts than the recipe called for, more like a cup of dried fruit and maybe 1/2 cup cuts. I loved the added hearty feel they gave the bars. To make them you simply mix together the dry ingredients, add in the wet, make sure to stir in all the toppings, and then pour into a baking dish. I found that if I wanted to make portioning easier I could bake the bars in a muffin pan and then they were already divided. But if you opt to go that route, make sure you try and evenly distribute the solids to liquid ratio. Once the mix is in the baking dish, top with the sliced fruit and bake in a 360 degree oven for about 55 minutes or the center is set in the middle. For an added touch, top the bars with a little shredded coconut and it adds a fantastic little hint of sweetness and texture.
I would freeze these and reheat for breakfast. Perfect as is or if you are serving for a crown or feeling fancy, heat some milk gently in a sauce pan with a cinnamon stick and a dash of vanilla extract and you have the perfect breakfast treat.
Enjoy!
Article

Crustless Mini Quiche

As soon as the reality of 4 hours of class beginning at 8am kicked in, I realized that I needed to come up with a way to have a hearty breakfast that didn’t require me to get up at 5am everyday to make it. I did some research and started reading some of my favorite food blogs looking for the best hearty make-ahead breakfast ideas. While I found a couple good ones, the one that quickly became our favorite I found over at this site. I made my own adaptations to the recipe to fit the local ingredients available, etc. Tyler and I love these little things and I am trying to find time every week to replenish our stash in the freezer. Trust me, this recipe though seeming time-consuming at first is well worth the time.

What You Need For Batter:

1/4 cup cornstarch
 1 1/4 cup whole milk 
 2 large eggs
 2 large egg yolks
 1 cup heavy cream
 3/4 teaspoon kosher salt
1/8 teaspoon nutmeg

**note: I often substitute half-n-half and skim milk for some or all of the heavy cream and whole milk to cut down on fat and calories. So far, it has tasted great even with the substitutions so feel free to make them a little healthier.

For Filling:

minced garlic
sliced onions
sliced potatoes
chopped bell peppers
sliced spinach leaves
diced tomatoes
cooked bacon pieces
shredded parmesan cheese
fresh chopped basil
olive oil 

**note on the filling: you can put anything you want inside of these. This is my favorite filling, but I have added all kinds of things to these. You can add any filling you can invent.

Heat oven to 450°F.

To Prepare Batter: Put the cornstarch in a medium bowl. Whisking steadily, slowly pour in 1/2 cup of the milk, mixing until quite smooth. Whisk in the whole eggs and egg yolks, mixing again until smooth, then gradually whisk in the rest of the milk, the cream, salt, and nutmeg. Be sure to re-whisk well if you let it sit for a little while as you prepare the rest, it tends to separate.

To Prepare Filling: To make my favorite filling I add a little olive oil to a large pan and add the potatoes seasoned with salt and pepper. I heat them over high heat to get them golden brown and then I turn the heat down to low to let them soften up. When they are almost done, I add the garlic and onions and let cook for about a minute, then I add the bell peppers and kick the heat back up. After the peppers start to soften, I add the spinach and stir for about 30 seconds and then remove it from the heat.

Oil mini muffin tins well. The original recipe was for mini muffin tins, but I used regular sized ones because that is what I had and actually found that one muffin tin sized quiche was the perfect amount for Tyler and I for breakfast. Put a pinch grated cheese into each muffin cup, a couple spoon fulls of the veggie mixture and throw in some bacon crumbles and a couple tomato pieces. Then top with fresh basil leaves. Into the cup spoon in the batter. Usually each muffin tin took about 1/4 cup batter.

All filled up and ready for batterBatter in and ready for baking.

Bake until the quiches puff and start to turn golden, 15-25 minutes. My oven is finicky, but it is important that they are set in the middle or you will never get them out of the cups. Let cool for 10 minutes and then carefully run a paring knife around the rim of each muffin cup. Carefully lift each quiche out of its cup.

Fresh out of the oven - they look tasty!

Fresh out of the oven - they look tasty!

I make these babies ahead of time and freeze them for breakfast. I make a weeks worth of quiche on Saturday and Tyler and I can have yummy breakfast all week. I take the quiche out of the freezer the night before (if I remember) and pop it in my toaster oven at about 400 degrees for 10 minutes or until hot.

These will revolutionize your early mornings. And they are hearty enough to keep me going even when I have 4 hours of class in the morning.

Enjoy!

** Sorry my pictures are not as pretty as the picture on top I stole form the website, but at least you know I really made them. I should really get out the nice SLR for these photos, but I am usually too lazy. 
Article

Shark Sliders

So this recipe post is way overdue, but I wanted to write about it because they were so tasty. One day when Tyler went to the fish market downtown he found shark for so cheap. So when he came home, he handed me a bag full of a pound of little shark meat pieces. I was a little unsure how one goes about cooking shark, but then I decided that nothing could be better than making it into little burgers.

What You Need:

shark
little rolls
Italian dressing
pepper
lettuce
ketchup
mayonaise
hot sauce
lime juice

I marinated the shark pieces in the Italian dressing with a little extra black pepper for about 30 minutes or so. While it was marinating, I mixed together some mayo, ketchup, lime juice and hot sauce to form a little sauce for the buns. I cooked the shark in a hot skillet on the stove until done and flaky. I added the extra marinade to the pan to keep it nice and moist. Onto warmed rolls I spread the sauce and added a couple shark pieces and lettuce.

It was simply delicious. And the best part, took practically no time and no effort. We liked it so much we are hoping we might find more shark soon. And at only 5ec a pound, it was a steal.

Enjoy!


Article

‘Grilled’ Marinated Sailfish

Marinades are my favorite.  Mostly because I can just dump a bunch of stuff I have in my cabinets into a bag with some meat, place it in the fridge, forget about it, and it always tastes yummy. So, with our new fish obsession I was looking for some other things to try.  I came across this super simple marinade and thought I would give it a try – and it was fantastic!

What You Need:

Sailfish steaks
4 cloves of garlic

1/3 or so cups white wine
1/4 cup lemon juice (or lime)
2 Tbs soy sauce
2 Tbs olive oil
pepper
thyme
rosemary
a dash of nutmeg 

With the citrus and the wine, this marinade didn’t need too long to sit. It was done after about 30 minutes or so (perfect amount of time to get a little more studying in). The inspiration recipe was for grilled fish, but we don’t have a grill in Grenada. So instead I just cooked the fish in a skillet on the stove. Not the same as grilling, but it actually came out really good. The marinade kept the fish really moist. I just seared the outside on high heat and then cooked the rest of it on low heat until it flaked easily.

Tyler loved this dish. It came out really well for being such a different take on fish. I hope to try this at some point when we are back in the states when I can actually grill the fish.

Enjoy!


Article

Chicken and Rice Bake

I have been looking out for some good casserole type meals that are quick and easy. I always like being able to throw some ingredients into a dish, pop them in the oven, and do some reading while it bakes. No one has to know the oven does all the work right?

So I found the inspiration for this meal over on Big Oven, one of my favorite cooking apps on my iPad. A simple, savory chicken and rice dish. And despite the heavy helping of broccoli inside, Tyler still liked it too.

What You Need:

2 chicken breasts, thin
3/4 cup rice (I used brown)
1 can condensed cream of broccoli soup, low fat (any other kind is fine)
1/2 package frozen broccoli
3/4 cup of water or so
fresh ground pepper
cayenne pepper
garlic powder
dried thyme
1/2 cup or so of shredded cheddar cheese

To make, mix the rice, water, and the can of soup in your baking dish. Then stir in the broccoli and add a little black pepper. I seasoned the chicken breasts on both sides with some pepper, garlic, cayenne, and thyme and then snuggled them into the dish.ready for the oven

Cover the entire dish with aluminum foil and place into a 375 degree oven (I now have a oven thermometer, so I can actually semi-monitor my oven temp and try and keep it steady). After about 30-40 minutes, it should be done. Cook until the liquid is absorbed and the chicken is cooked all the way through. Once the dish is done, top with the shredded cheddar cheese and allow to melt. For an added touch, add some breadcrumbs (or crushed cornflakes) on top and give it a quick pass under the broiler to develop a slightly crispy top layer.all done - looks great!

With a nice, fresh salad or some extra fresh steamed veggies you have a delicious dinner. Enjoy!

Article

Roasted Vegetable Pesto Sandwiches

So one of our favorite restaurants here in Grenada is Umbrellas. We love it mainly for the fact that it is right on the water and has an amazing view of the ocean sunset and because they have a 5EC happy hour Tuesdays-Fridays. We also like going there because they have really good food. While we often praise them for being out favorite nachos on the island (although we REALLY miss SoCal’s Mexican food) but they have some really good sandwiches. We often order a grilled vegetable and a grilled fish sandwich, an order of sweet potato fries with jalapeno dip and share. It is delicious, especially with a rum and Ting to go with it.

Anyways, I got inspired by the deliciousness of those veggie sandwiches and the overabundance of eggplant in the markets to try my hand at making my own sandwich. I clearly do not have access to a grill so I decided to roast my vegetables. But ever since my discovery of the greatness of roasted eggplant, I am obsessed with incorporating it into every meal possible.

What You Need:

2-3 eggplants
2 carrots (local Grendian carrots are small, so you might need more)
3 green bell peppers
1 small onion
goat cheese (strongly recommend the cheese from Belmont Estate)
pesto sauce
salt and pepper

olive oil
balsamic vinegar
focaccia bread (I actually found some good tomato and parmesan focaccia that worked well, so you can find some)

The trickiest part of making these sandwiches is that the vegetables take different amounts of time to cook. I found that getting the carrots to be soft took way more time than the eggplant took – and of course onions and bell peppers really don’t take that long to roast. I sliced the carrots into thin, wide slices and I cut the eggplant along the diagonal to yield larger slices. I simple sliced the onions and left the bell peppers whole with only the stems removed. I first placed the carrots into a baking dish and seasoned them with sea salt, pepper, a little olive oil and some balsamic vinegar. I put the carrots into a hot oven to roast, about 400-450 degrees. I gave them about a 15 minute head start before adding the other veggies.

I added the slices carrots and bell peppers to the same dish as the carrots and gave everything a stir and added in the eggplant on a different dish. However it works with your kitchen, the goal is to wind up with all of your veggies soft.

I sliced the bell peppers into usable slices once everything came out of the oven. I had previously warmed my bread a little in the toaster oven on a low setting. To make the sandwiches, I spread pesto on each slice of bread, placed on heaping amounts of eggplant, carrots, onions and bell peppers. Then I crumbled on some goat cheese (or a lot) and presto – yummy sandwich!

If you want, you can also add some fresh sliced tomatoes or some lettuce to your sandwich too. I also found that a little drizzle of balsamic vinegar on the finished product was also good, but these are all up to you.

We were quite pleased with our try at this sandwich – it came out really good. You won’t be sad making some of these up for dinner one night.

Enjoy!

Article

Roasted Eggplant

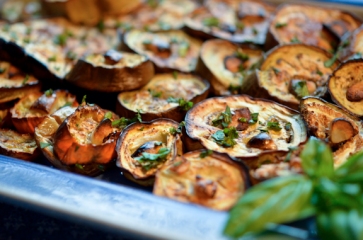
Roasted EggplantThe eggplant season is in full swing. And let me tell you, they are beautiful! I have always liked eggplant, but honestly they can be a little expensive in the states. I also never really used them to make too much outside of Italian food. An eggplant parmesan here and there was generally the extent of my eggplant usage. But when I learned I could get a couple pounds for about 3EC, I decided I needed to branch out.

I wanted to use up some eggplant as a side dish for a simple weeknight dinner so I suddenly realized I should give roasting a try. I found a sweet, simple recipe online and gave it a try. I proceeded to fall in love with my new roasted eggplant discovery.

What You Need:

A few eggplants
2-3 cloves of garlic
olive oil
salt and pepper 

All you need to do is slice the garlic cloves into thin chips and then slice the eggplant into about 1-1.5″ thick slices. Arrange them into a lightly sprayed baking dish or baking sheet, brush the eggplant slices with olive oil and sprinkle with salt and pepper. Then press into each eggplant slice one (or a few) garlic chips. Then place it into a nice hot oven (somewhere around 400 degrees or so) and roast for about 15 minutes or until soft and golden brown.

The roasting highlights how buttery and sweet the eggplant is and the garlic tastes oh so good. And if you are looking for a fun alternative or want to add some extra flavor, I also tried adding a light drizzle with balsamic vinegar before roasting with great results.

Enjoy!

Article

Savory Baked Snapper

So one of my favorite things (as those who have read other posts can attest to) are these little spice bundles that are sold along with green onions at the local market here. I love that I can get some fresh herbs and spices for basically free around here. But I had picked up a couple really nice bundles at the market and they always include this little leafy herb known here as shadow benny. I have only more recently actually learned what it is called, but it smells so savory and delicious I have thrown it in a few meals here and there when it just felt right. But inspired by this savory, almost stew-like herb – I decided to play around with a savory snapper dish.

What You Need:

2 snapper fillets
green bell peppers, sliced (or any other color, but green are local here)
onion, sliced
4 bay leaves
2 shadow benny leaves (optional)
2-3 limes, sliced
green onions, chopped
black pepper

What I did was I first constructed some aluminum foil baking pouches. I sprayed the inside lightly to prevent the fish from sticking. Then I quickly sautéed the bell peppers and onions to give them some flavor and assure they would be soft and added about 1/4 to each pouch. Then I placed in a bay leaf and then laid my fish filet, skin down, on top. I seasoned the top well with pepper, placed my shadow benny leaf, and then covered it with lime slices. Then I added another bay leaf and topped another 1/4 of the vegetables in. Fish in the pouches ready for the oven!

I closed up my little foil pouch and placed them into the oven, at about 350 degrees or so (my oven has numbers, so I went with 3 in my 1-4 scale, whatever that is). Once the fish was cooked and flaked easily, I considered them done and served them up with some fresh veggies and probably some rice, Tyler’s favorite. The fish was so moist and so flavorful!Cooked and Ready for Eating

We were in love with this dish. I highly recommend it. And for all of my oven-less friends on the island, a toaster oven is your best friend so don’t forget it can bake too! You so need one. Enjoy!


Article

5-minute Chocolate Cake

Seriously, this recipe is bomb! And a major go-to for emergency chocolate cravings, stressed out medical students, moody girl time, and treating hubby’s belly. A friend of mine found this and posted it on a Facebook group for all of us students. I must say that even though I do, in fact, have an oven – this is so easy to make. Plus, I don’t have a mixer or a huge supply of baking dishes here but I do have coffee mugs. We have played around with the recipe a little and we definitely recommend adding a chocolate bar in if you don’t have chocolate chips (so far M&Ms, snickers, and Grenadian Chocolate Bars have all been fine contestants). I would also say feel free to add a little extra liquid, I found that mine came out a little dry but one I added a splash extra milk – it was pure delight. Last tip, don’t overcook! Nothing like a dry, hard cake. But by the second try I had a delicious, fudgey, warm chocolate cake right out of the microwave – literally taking only 5 minutes. Check out how to make it here, or watch the video below. Enjoy!


Article

Quick and Easy Eggplant Parmesan

Eggplant is everywhere here these days. Neither Tyler nor I would have expected eggplant to be a local produced item here, but it is and it is cheap and delicious! So, we have taken to eating a lot of eggplant these days, mixed into pastas, roasted, on a sandwich, you name it. One of my favorite dishes is eggplant parmesan, but the way I generally make it is a bit time consuming. The breading and the frying and then baking takes a bit too much time for my med student schedule when my hopes are to come home from class and get dinner on the table in 30 minutes or so if I can. So I invented a quick and easy version that tastes almost as good as the real thing.

What you Need:

Eggplant
Fresh Basil
Tomato Sauce
Parmesan Cheese
Mozarella Cheese
Dried Thyme
Ground Pepper
Sea Salt

Olive Oil

So what I do is just chop up the eggplant into some bite-sized pieces and saute in a really hot pan with just a touch of olive oil. Eggplant tends to absorb oil and get mushy or oily fast, but I found that a really hot pan with just a touch of oil and some salt and pepper. I found the the eggplant gets crispy on the outside and soft and sweet on the inside. Then coat a baking dish with some pasta sauce, add some freshly chopped basil, add eggplant, add more basil, cover in sauce, then top with cheese and pop it in the oven. I generally shoot for an oven somewhere around 350 degrees. After about 20 minutes and the sauce is all bubbly and the cheese golden brown, it is ready for some eating. Serve over some pasta for the perfect quick dinner. Enjoy!

**Sorry I don’t have any photos of the making, my camera battery charger got shot in the move and I didn’t have my new charger yet. It is okay, trust me, it looks and tastes amazing!

Article

Broiled Cajun Red Snapper

Yummy Snapper DinnerOne of the best things about living on a tiny Caribbean island is the fresh fish. Fish that was swimming probably that morning winds up on your plate and it is so yummy. Tyler and I went to the market last weekend and were fortunate to find that there were a ton of huge red snappers, which has quickly become one of our favorite fish. So for about 15 US dollars we were able to get 6 pounds of freshly caught snapper. We gave the “fish master” a couple bucks to fillet them for us and have since been reveling in the deliciousness.

That night we decided we had to have fish so I made one of our favorites, Broiled Cajun Red Snapper. The fish comes out moist with that amazing citrus taste and yummy savory spicy goodness.

What You Need:

Red Snapper Fillets
Cajun Seasoning (this is super common here in Grenada, but you could easily mix your own if you don’t have the pre-mixed stuff)
Limes (or lemons)
Onion 
Garlic cloves
Olive Oil
Black Pepper

First I dice up the onions and the garlic cloves. Then in a hot pan I saute them with some olive oil until they are a nice golden-brown in color. I slice the limes up into thin circular slices and then set them aside. Next, I spray my trusty toaster oven broiler sheet with some cooking spray (we don’t have a broiler in our oven, but a regular baking sheet in an oven will work too) and place on my dried fish filets. Next I season the fish well with a little black pepper and lots of cajun seasoning. I drizzle on a little more olive oil, top with the onion-garlic mixture.Fish with the onions all ready

ahen cover with the lime slices. Then place the whole sheet into the broiler and cook until the fish flakes, about 10 minutes or so. That is all it takes.

This is seriously one of our favorite dishes. So much so that not only does Tyler request it, but we made it for his parents when they were here too. I usually make it with some lime flavored white rice and steamed veggies for a good, healthy mid-week dinner. Enjoy!

All Done!

Doesn't that look delightful?

Article

Baked Sailfish Revisted

One of our favorite and very Grenadian dishes has been making baked sailfish. I wrote all about it here and you can follow my recipe as trust me, you will not be disappointed.  However, I wanted to take a minute to write about a variation we tried out. Since we get so many awesome local and  fresh spices in these bundles with our green onions, I got inspired to get extra savory with the sailfish. I sliced up some onions and green bell peppers but also added some carrots and celery to the dish (celery comes with the green onions). I seasoned the sailfish the same way but omitted the lime juice. I also through in sprigs of all the savory spices there was. I added some of the thyme and then a few other things that I honestly did not know what it was, but it smelled delicious. Then add a bay leave to the top and place the tomato slice on and bake it. It really did taste like a different dish. We were very happy, it was almost like a fish roast. Give it a try, especially if you can get your hands on a delicious bundle of Grenadian green onions and spices.

Article

Chicken Parmesan

Chicken ParmesanI know I have mentioned I am sure dozens of time about the local produce markets, but really – I just love them. We went this past Saturday and I was looking for some green onions. As I am now a pro stand shopper, I scoped out a lady on the street who had the best pickings and went to her. I bought two bunches and as she handed them to me I could just smell all the fresh herbs tied up with my onions. I feel as though I have mentioned this practice before, but I really think it is awesome that they do this. It is like fresh herbs for free. When we got home I was taking things apart to store, and noticed that in addition to the typical thyme, there was so much fresh basil and some celery and some other savory leaves that I don’t even know what they were. You can read what I did with the celery and such here. So with my new acquisition of so much fresh basil, I was inspired to try my hand at making one our favorite Italian dishes, Chicken Parmesan, here in Grenada.

What You Need:

2 chicken breasts
fresh basil
1/2 jar pasta sauce
mozzarella cheese
parmesan cheese
thyme
oreganogarlic powder
bread crumbs
flour
1 egg
olive oil
salt and pepper

You start off with a simple breading of your chicken.  I add some pepper into my flour mixture and then add the dried thyme, oregano, and garlic powder to my bread crumbs. Then pat chicken breasts dry, dip in flour and shake off all extra, dip in egg, then coat in breadcrumb mixture. Then saute the chicken breasts in a pan with a little olive oil until golden brown. Then, take a baking dish and cover the bottom with a layer of pasta sauce. Then add lots of fresh basil leaves. Then place your chicken breasts in, top with some more pasta sauce and more fresh basil leaves (and a little sprinkling of thyme if you wish) then top with mozzarella and parmesan cheese. Place the whole thing in the oven (around 400 degrees) for about 15 or 20 minutes until warm and bubbly. And that is all it takes. I usually serve it on top of some angle hair pasta (or spaghetti or linguine – whatever you like) and of course some garlic bread which is a favorite of Tyler’s when I make it with fresh chopped garlic pieces.

It was quite a delicious meal. We have decided that for the next time we get some basil, we might make this dish again and check out the wine shop and see if we can find something suitable there.

Enjoy!